⚙️ Sales Settings
Advanced sales configuration and lead management settings for your real estate CRM
📋 Overview
Sales Settings is a comprehensive configuration section designed specifically for administrative departments and real estate company managers. This section contains critical settings that control lead management, duplication handling, and sales process automation. These configurations directly impact how your sales team interacts with leads and manages customer data throughout the sales pipeline.
Proper configuration of these settings ensures efficient lead processing, prevents data conflicts, and maintains data integrity across your sales operations.
👥 Add Lead & Duplication Management
This section contains essential settings for managing lead creation and handling duplicate entries. These are system-wide settings that affect how new leads are processed and how the system handles existing customer data.
🌍 Country Code Configuration
Show the (Select) in Country Code Menu
On/Off Setting: Controls whether a "Select" option appears at the top of the country code dropdown menu before all country options.
⚠️ Important Note: This setting may conflict with other configurations. For example, if country code is set as mandatory, users must select a specific country code, making the "Select" option problematic as it doesn't represent a valid choice.
📝 Lead Management Controls
Unable To Copy The Lead Number
On/Off Setting: When enabled, prevents users from copying lead numbers, enhancing security and preventing unauthorized lead number duplication.
Generate Fake Email on Lead Creation
Critical Setting: This is an important feature for lead management. When a customer doesn't have an email address, the system automatically generates a random email address for them.
Why This Matters: The generated email allows customers to access their dedicated portal where they can view available units, payment plans, installment schedules, and all personal information. This is essential because the system cannot create new leads without email addresses, as emails are linked to all customer-related data and services.
📧 Email Notification: When the option to send email credentials to customers is enabled, the system will automatically send an email containing the login credentials (email address and password) to the customer. This applies to both manually entered email addresses and system-generated fake emails, ensuring customers can access their portal regardless of how their email was created.
Fake Email Domain Name Value
Configure the domain name that will be used for system-generated email addresses.
Example: @dotshub.com
Result: Generated emails will appear as randomname@dotshub.com
🏷️ Request Tags Management
Request Tags
Define custom tags that appear in the Request section to categorize request status or priority level.
Default Tags Include:
- VIP: High-priority customers
- Urgent: Time-sensitive requests
Note: You can add unlimited custom tags to meet your business requirements.
📊 Reports Configuration
Show Blocked Agents In Reports
On/Off Setting: Controls whether blocked/inactive agents appear in system reports and analytics. When disabled, only active agents will be included in reporting data.
🔄 Duplication Control System
Advanced settings for managing duplicate lead entries and controlling how the system handles existing customer data when new entries are attempted.
🚫 Duplication Control
On/Off Setting: When disabled, prevents previously registered customers from being entered again as new leads, maintaining database integrity.
✏️ Change Lead Info
On/Off Setting: When enabled, allows updating existing customer information (like address) when a duplicate entry is attempted. When disabled, preserves original data.
⚠️ Show Duplication Warning
On/Off Setting: Controls whether users receive visual warnings when entering duplicate customer data. When disabled, no alert is shown, but duplicates are still handled according to other settings.
🔄 Change State
On/Off Setting: When enabled, updates duplicate leads with new status/state information. When disabled, maintains the last recorded state in the system.
🆔 Change Lead ID
On/Off Setting: When a duplicate lead comes from a different source, this setting controls whether to update the lead with the new source or maintain the original source information.
👤 Change Creator
On/Off Setting: Controls whether to update the lead creator name to the last person who added the duplicate entry, or maintain the original creator's name.
📧 Communication & Display Settings
📤 Send View Unit Email via Agent's Email
On/Off Setting: When enabled, unit viewing emails are sent from the assigned agent's email address rather than the system default email.
📅 Leads History Sorting (Descending)
On/Off Setting: Controls the default sorting order for lead history. When enabled, shows most recent entries first (newest to oldest).
🎯 State Action Configuration
Advanced workflow automation and state management settings that control lead progression, sales stages, and action requirements throughout the customer journey.
🎉 Done Deal State Management
📊 Done Deal State Selection
As a sales manager, define which stages you consider as "Done Deal" status. Select from available lead states to mark successful conversions.
- Interesting
- Reservation
- Coming-Visit
- Meeting
- Not-Interested
- Following
- Done-deal
💡 Selection Tip: Hold CTRL key to select multiple states. All states are customizable and can be added/renamed in their respective settings sections.
🔗 Done Deal Linked to Reservation
On/Off Setting: Determines if done deals must be mandatory linked to reservation phase.
🔄 Keep Reassigned Leads State
On/Off Setting: Maintains the current state when leads are reassigned to different agents.
⚙️ State Requirements Configuration
⏰ States Without Time/Date Requirements
Select states that don't require specific time and date scheduling for next actions or follow-ups.
Multi-Select: Hold CTRL to select multiple states. All states are customizable from settings.
📍 States Requiring Check-in
For sales representatives visiting clients, system will prompt for location check-in to track and save location data when arriving at customer sites.
GPS Tracking: Helps monitor field sales activities and customer visits.
📋 Complete Fields Required States
Select states that require all next action fields to be completed before proceeding.
Data Integrity: Ensures comprehensive information collection at critical stages.
💬 Feedback Required States
Define states that mandate feedback collection from customers or sales representatives.
Quality Control: Maintains service quality through systematic feedback collection.
🤝 Meeting Setup States
Select states that enable meeting location setup and guest contact management features.
Meeting Management: Facilitates organized customer meetings and appointments.
📋 Dropdown Lists Configuration
Configure system-wide dropdown options that appear throughout the CRM for consistent data entry and categorization.
📝 Important Note: All dropdown options shown below are examples only. These are not default system values - you must configure and add your own custom options according to your business requirements. The system allows you to create, modify, and manage all dropdown lists as you see fit.
🎯 Customer Segments
Customer categorization levels:
🏠 Purchase Purpose
Customer buying intentions:
📞 Contact Tools
Communication methods:
💬 Reply Options
Communication outcomes:
🌟 System Integration: These dropdown options appear throughout the entire CRM system, ensuring consistent data entry and reporting across all departments and functions.
🔧 Additional State Settings
📋 Show Reply Options in Next Action
On/Off Setting: Controls whether reply options dropdown appears in next action forms.
👁️ Set No-Action State Visible
On/Off Setting: Makes "No-Action" states visible in the system interface.
📍 Require Check-in Before State Move
On/Off Setting: Mandates location check-in before allowing state transitions.
📊 Show Lead Info in Call Center Export
On/Off Setting: Includes detailed lead information in call center data exports.
🔔 Notifications Configuration
Comprehensive notification settings and alert configurations that control automated email notifications, timing alerts, delay warnings, and communication workflows throughout the sales management system.
📧 Email Notification Settings
📤 Send Email On Lead Create
On/Off Setting: When enabled, automatically sends login credentials (email address and password) to customers via email upon lead creation.
🔗 Related Settings: This feature works in conjunction with "Generate Fake Email on Lead Creation" and "Fake Email Domain Name Value" settings discussed in previous sections. The system will send credentials to both manually entered and system-generated email addresses.
⏰ Timing & Alert Management
⏱️ Notify Time Before (in hours)
Set the number of hours before a scheduled next action when the system should send advance notification alerts to relevant users.
Example: Setting "2" will send notifications 2 hours before any scheduled follow-up or action is due.
📱 System Coverage: Notifications are sent to all relevant users across the system to ensure no important actions are missed.
⚠️ Delay Notification Management
🚨 Delays (System Notifications)
Configure which types of delays should trigger system notifications and alerts within the CRM interface.
Multi-Select: Hold CTRL key to select multiple delay types for comprehensive monitoring.
📧 Delays (Email Notifications)
Select which delay scenarios should trigger automatic email notifications to relevant stakeholders.
Email Alerts: Ensures important delays are communicated via email for immediate attention.
⏳ Delay Notification Within (hours)
Set the time window (in hours) for sending delay notifications to team members when actions are overdue.
👔 Delay Notification to Managers (hours)
Configure separate timing for escalating delay notifications to management level after specified hours.
👥 Sales Assignment & Activity Notifications
Configure automated email notifications for sales team assignments, management oversight, and activity tracking.
📬 Email Notify For Sales When New Assign
On/Off Setting: Automatically sends email notifications to sales representatives when new leads are assigned to them.
👔 Manager Notification on Lead Assignment
On/Off Setting: Sends email notifications to salesman managers when leads are assigned to their team members.
✅ Manager Notification on Action Completion
On/Off Setting: Notifies salesman managers via email when their assigned salesmen complete lead actions.
🔄 Cross-User Action Notifications
On/Off Setting: Sends email alerts to both salesman and manager when lead actions are performed by other users in the system.
📊 Management Oversight: These notification settings ensure proper communication flow between sales teams and management, maintaining transparency and accountability throughout the sales process.
🔄 Rotation Configuration
Advanced lead rotation and distribution settings for automated assignment workflows. This powerful system enables fair and efficient lead distribution among your sales team based on customizable conditions and schedules.
🎯 Rotation System Control
🔧 Rotation On/Off
Master Control Setting: Enable or disable the entire lead rotation system. When enabled, this feature will significantly streamline your lead distribution process and provide advanced configuration options.
⚡ System Impact: Activating rotation unlocks powerful automation features that will greatly improve your lead management efficiency and team workload distribution.
📅 Working Days Setup
🗓️ Working Days Selection
Define your business operating days for lead rotation. The system will only distribute leads during your specified working days.
💡 Selection Method: Hold CTRL key while clicking to select multiple days. You can choose any combination of days that match your business schedule.
📋 Important: Days not selected as working days will have no lead rotation activity. This ensures leads are only distributed when your team is available to handle them.
⚠️ Global Distribution Settings
🌐 Rotation All User
Critical Setting: When enabled, this option distributes leads to ALL users with lead-receiving permissions throughout the entire system.
⚠️ WARNING: This setting is not recommended unless you fully understand its implications. It will distribute leads to managers, customer service representatives, agents, and all other users with permissions - which may not align with your organizational structure and workflow requirements.
🎛️ Advanced Rotation Management
⚙️ Rotation Management Button
Access the dedicated Rotation Management interface where you can view, create, modify, and manage all rotation conditions in your system.
🚀 Full Control: This opens a comprehensive management page where you can easily pause, activate, or delete rotation conditions as needed for your business operations.
➕ Creating New Rotation Conditions
After clicking the Rotation Management button, you can create new rotation conditions using the "ADD NEW" feature.
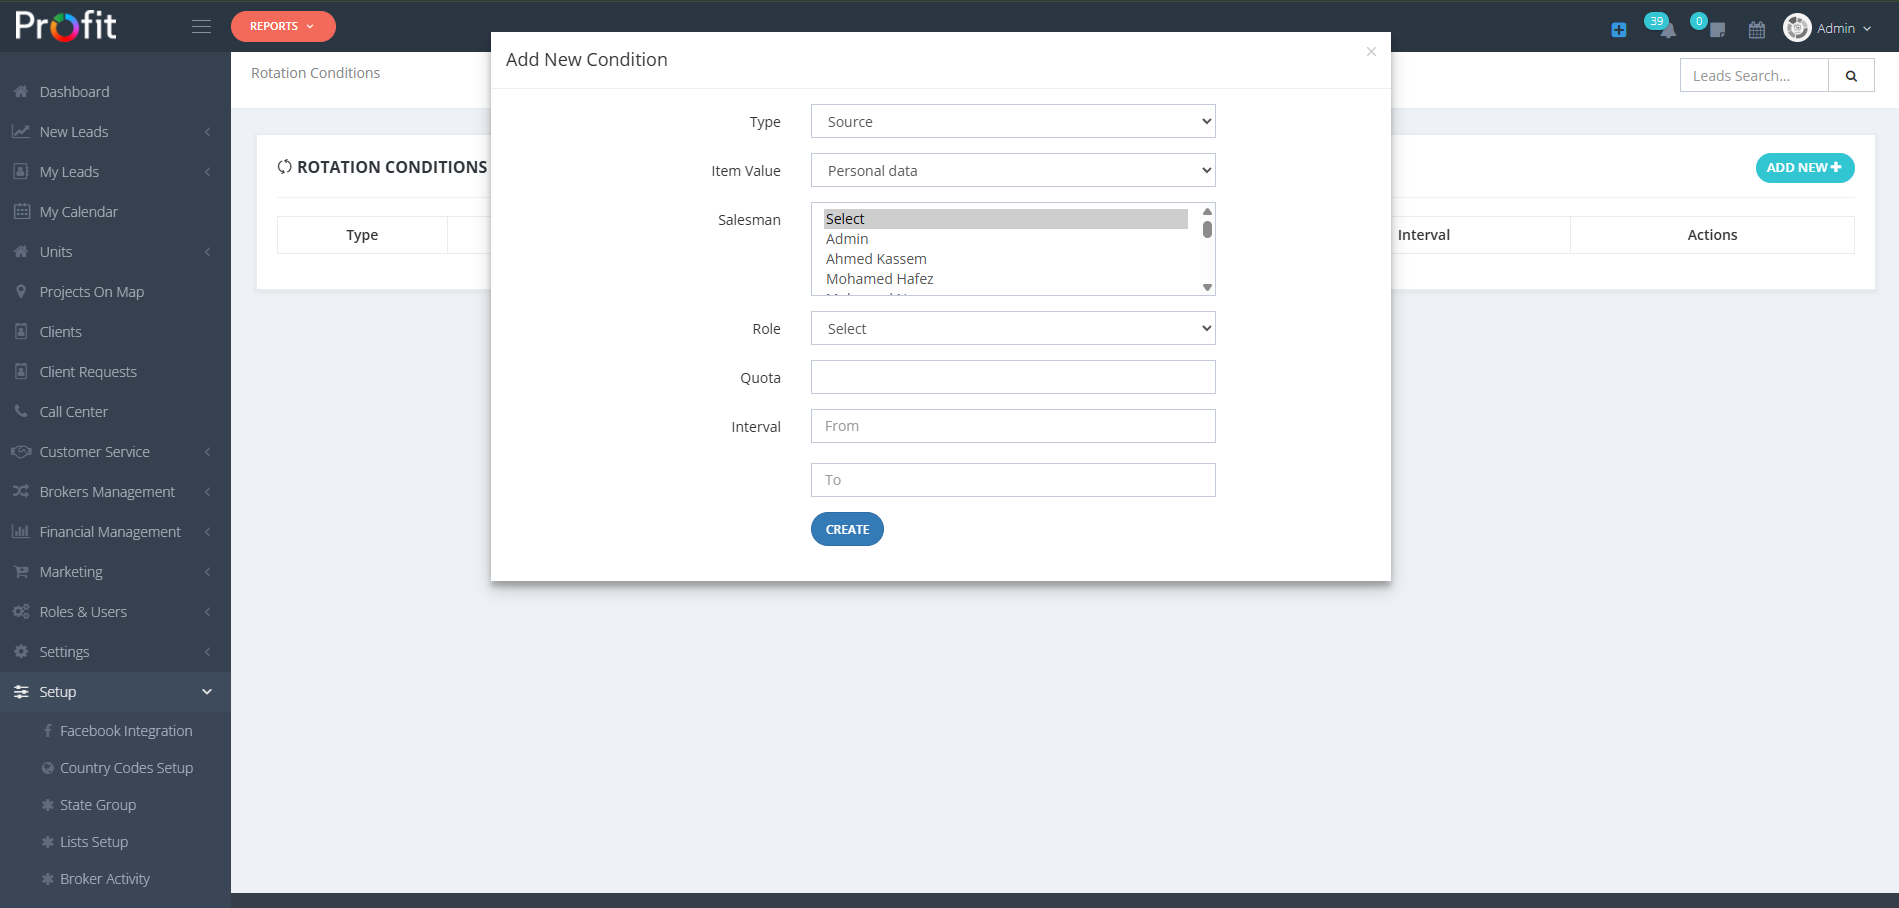
Rotation Condition Configuration Interface
🎯 Type Selection
Choose the criteria type that will control this rotation rule:
• Project
• BrokerProjects
• Field
• Country Code
• Branch
• Lead ID
📝 Item Value
Based on your Type selection, choose the specific value:
Dynamic Options: If you select "Project", all available projects will appear. If you select "Country Code", all country codes will be displayed.
👥 Salesman Assignment
Select specific salespeople to receive leads from this rotation rule.
Multi-Select: Hold CTRL key to select multiple salespeople for this rotation condition.
🎭 Role Assignment
Override individual salesman selection by choosing a role-based distribution.
Role Override: This setting bypasses your previous salesman selections and distributes to all users with the selected role.
📊 Quota Configuration
Set the number of leads each person receives per rotation cycle.
• Quota = 1: Each person gets 1 lead, then cycle restarts
• Quota = 5: Each person gets 5 leads before moving to next
Choose the best quota for your management style and team capacity.
⏱️ Interval Duration
Define the active period for this rotation rule.
Flexible Duration: Set specific dates or leave empty for continuous operation until manually stopped or deleted from Rotation Conditions.
🎯 Smart Distribution: The rotation system intelligently manages lead distribution based on your configured conditions, ensuring fair workload distribution and optimal sales team efficiency.
💰 Withdraw Configuration
Advanced lead withdrawal and reallocation settings that automatically redistribute inactive leads to maintain optimal sales performance and prevent lead stagnation throughout your sales pipeline.
🔄 Lead Withdrawal System
📤 Withdraw Leads
On/Off Setting: Enables automatic lead withdrawal from sales agents when they fail to interact with assigned leads within specified timeframes.
Example Scenario: A lead is assigned to a sales employee who doesn't contact the customer within 1 hour. The system automatically withdraws the lead from that employee and marks it as new for redistribution.
🔄 Redistribution Logic: Withdrawn leads are automatically redistributed based on previous Rotation settings, or if rotation is disabled, they are placed in the Leads Stock for manual assignment.
📞 Call Center Withdrawal System
🎧 Withdraw By Call Center
On/Off Setting: When enabled, applies withdrawal rules specifically to the Call Center team for customer service interactions.
📋 Important Note: This setting extends withdrawal rules to customer service teams, ensuring timely responses to customer inquiries and preventing service delays due to inactive assignments.
⏰ State-Based Withdrawal Timing
Configure specific hour intervals for each lead state to determine when withdrawal should occur. Each state can have different timing requirements based on urgency and business priorities.
🆕 Fresh Leads (in hours)
Set the maximum hours allowed for new lead interaction before automatic withdrawal. Critical for immediate response requirements.
📞 Withdraw Following (in hours)
Define timeout period for follow-up activities. Ensures consistent communication with prospects in follow-up stage.
🚗 Withdraw Coming-Visit (in hours)
Configure withdrawal timing for scheduled visit preparations. Maintains appointment scheduling efficiency.
🤝 Withdraw Meeting (in hours)
Set meeting-related withdrawal timeframe. Critical for maintaining professional meeting schedules and client relationships.
⏳ Withdraw Pending (in hours)
Define timeout for pending status leads. Prevents leads from remaining in limbo state without action.
⭐ Withdraw Interesting (in hours)
Configure withdrawal timing for leads marked as interesting. Balances nurturing time with action requirements.
🏠 Withdraw Reservation (in hours)
Set withdrawal timeframe for reservation-stage leads. Critical for closing deals and maintaining sales momentum.
📋 Withdraw Follow After Meeting (in hours)
Configure post-meeting follow-up withdrawal timing. Ensures timely follow-through on meeting commitments and next steps.
⚡ Performance Impact: These timing configurations directly affect sales performance metrics and customer satisfaction. Configure based on your team's capacity and customer expectations for optimal results.
🎫 Ticket Withdrawal System
🎫 Withdraw Ticket
On/Off Setting: When enabled, applies automatic withdrawal rules to support tickets and customer service assignments.
🎯 Purpose: Ensures tickets don't remain unattended, maintaining high customer service standards.
⏰ Remove Ticket Assign After (in hours)
Define the maximum hours a ticket can remain assigned to a team member without action before automatic reassignment.
📊 Service Quality: This setting helps maintain consistent response times and prevents customer service delays.
📧 CIL Configuration
Customer Information Letter (CIL) settings that control automated email reminders, state-based triggers, timing configurations, and internal logging for comprehensive customer communication management.
🔄 CIL Reminder System
📤 Resend CIL Reminder
On/Off Setting: Enable or disable the automatic CIL reminder system that sends follow-up Customer Information Letters to clients based on predefined conditions.
🎯 Purpose: Ensures consistent communication with customers through automated CIL delivery, improving customer engagement and reducing manual follow-up requirements.
🎯 State-Based CIL Triggers
📋 Resend CIL Reminder States
Select the specific lead states that will trigger automatic CIL reminder sending. This allows you to target customers at particular stages of their journey.
💡 Multi-Selection: Hold CTRL key while clicking to select multiple states. You can choose any combination of states where CIL reminders should be automatically sent.
🎪 Strategic Targeting: Choose states strategically based on your customer journey flow - such as "Interested", "Following", or "Pending" states for maximum impact.
⏰ CIL Timing Management
⏱️ Resend CIL Reminder Time (in hours)
Configure the time interval (in hours) between automatic CIL reminder sends. This controls how frequently the system will resend CIL reminders to customers in the selected states.
Example: Setting "24" means CIL reminders will be sent every 24 hours for customers in the configured states.
⚡ Best Practice: Balance frequency with customer experience - too frequent may annoy customers, while too infrequent may reduce effectiveness.
📨 Internal CIL Monitoring
📧 Internal CIL Log Mail
Add an internal email address that will receive a copy of every CIL sent to customers. This serves as a comprehensive logging system and allows designated staff to monitor all CIL communications.
📋 Use Cases: Perfect for maintaining records, supervisor oversight, quality control, or having a dedicated team member monitor customer communications for compliance and follow-up opportunities.
🏢 Broker CIL Customization
🎨 Broker CIL Conditions
Customize the footer/details section of your CIL emails with your company's specific information. This is where you add your company details, contact information, and branding elements that will appear in every CIL sent to customers.
Content Suggestions: Include company name, address, contact numbers, website, legal information, and any regulatory disclaimers required for your business.
🎯 Professional Appearance: This ensures every CIL reflects your brand identity and provides customers with complete company information for trust and credibility.
📱 Using Lead Search By Mobile Feature
Powerful Customer Service tool that enables instant customer lookup and seamless lead management through mobile number search functionality, streamlining customer support operations and new lead creation.
🎯 Customer Service Integration
🎧 Dedicated Customer Service Tool
This feature is specifically designed for Customer Service representatives to provide instant access to complete customer information during phone calls or inquiries.
⚡ Instant Results: Simply click the link and customer data appears immediately - no need to navigate through multiple screens or search manually.
🔄 Dual Functionality
The same link works for both existing customers and new leads:
- Existing Customer: Displays complete customer profile with full history
- New Lead: Automatically redirects to "Add New Lead" page with mobile number pre-filled
💼 Real-World Use Cases
🆘 Sales Representative Complaint
Scenario: Customer calls complaining about their assigned sales representative.
Solution: Customer Service agent quickly looks up customer, views assigned salesperson, and can immediately reassign to a different sales representative - all in seconds.
🏗️ Project Interest Registration
Scenario: New customer calls expressing interest in a specific project.
Solution: Customer Service agent adds the new customer, selects the interested project, assigns appropriate sales representative - complete onboarding in one seamless process.
📞 General Service Requests
Scenario: Customer calls with questions about their property, payment status, or any other inquiry.
Solution: Instant access to complete customer history, transaction records, and assigned team members for immediate, informed assistance.
🔗 Implementation Instructions
📋 Usage Instructions
To search for a mobile number or perform a quick customer lookup during or after a phone call, use the following link format:
Replace "mobileNumber" with the actual phone number you want to search for.
💡 Working Example
Example Link:
🚀 Pro Tip: Bookmark this link format in your browser for quick access, or create shortcuts on your Customer Service team's computers for instant customer lookup capability.
⚠️ Essential Requirements
Before using this feature, ensure the following critical requirements are met:
🔐 System Access Requirements
Customer Service Representative must have:
• Valid system account with username and password
• Proper permissions to view leads and customer data
• Active user status in the CRM system
🚪 Login Requirement
Important: The mobile search link will not function without being logged into the system first. Customer Service representatives must be signed in to their CRM account before clicking the search link for it to work properly.
⚠️ Administrator Notice
Critical Settings Warning: All configurations in Sales Settings directly impact sales operations and data integrity. Changes should be tested thoroughly in a controlled environment before deployment. Always backup current settings and inform your sales team of any configuration changes that may affect their daily workflows.